
Somebody on the ilovestitches fb page asked me how to make these fabric flowers. How nice...I don't really have people asking me how to make stuff, so I'm rather chuffed to be able to be of some use. Here it is:
What you'll need:
felt,
scraps of fabric,
button,
a needle and thread,
and a glue gun

1. Cut a strip of fabric (mine is about 3cm x 60cm, but you can make it whatever length or width you like) I've done a straight one and a scalloped one, just so you can see.
2. Cut two felt circles (one big, one small)

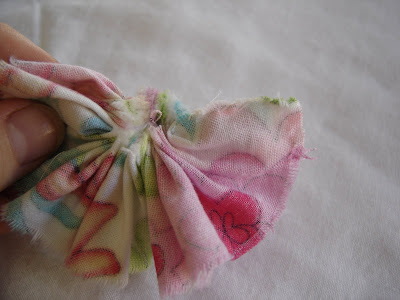
3. Do a rough stitch all the way across the length of the fabric. The stitches don't have to be even or the same length or anything. Make sure you've secured the thread at the start of your stitching, by knotting the thread or just stitching over the first stitch a few times. Stitch all the way to the end of your strip of fabric.

4. Pull the thread until you can't put it anymore, just don't break it - that'll amount to some major frustration.

5. Once you've done that...on the wrong side of the fabric, thread the needle through anywhere (have a look above) and do a few stitches to secure the thread and make sure it won't come loose - because again...it could lead to frustration if that happens. (I can get so frustrated with stuff that I'll end up giving up on the project I'm busy with)
6. Stitch your fabric like above, to join the ends.

Putting it together:
Stitch your button onto the small circle,
glue the fabric flower onto the larger circle,
and then glue the small circle onto the fabric flower....

And....voila....a fabric flower!
Add a brooch pin to the back to make a brooch if you like, or attach it to a headband, or a bag. You could make some smaller ones and make little hair clips.
This should only take you about 10 minutes tops to make, if you don't get interrupted. And if you don't have a glue gun, go buy one. It's a great investment, you use it for so much (I think they only cost about $4 at the cheappy store)

Here's my ill little girl with the one on her headband. Mmmm....The pic does look a bit odd doesn't it? That's because I told her to put her head at an angle so I could balance the fabric flower on the headband so I could get a shot of it. I didn't glue it down because she wanted another one I had made on there.
So that's that then. If you have any questions, you're welcome to email me.
Hope you all have a fab weekend!
xox


Beautiful work. Thanks for the tutorial as i've never tried to make these. Cathy
ReplyDeleteHow lovely, these are really beautiful. Nice tutorial too:)
ReplyDeleteThanks Red! Great tut, going to give them a go.
ReplyDeleteOh wow they look fantastic, I will have to give them a try!
ReplyDeleteThank-you for the LOVE on my Blog :)
How cute! Someday I will have a little girl, and when I do. I will make tons of these! Great job and thanks for showing us step by step.
ReplyDeleteThose are super cute! I have always wanted to learn how to make them, I'll have to give it a try!
ReplyDeleteWhat a lovely tutorial, so sweet!
ReplyDelete